Long Fins - V3 - Stiff Competition
Full-length competition fins tuned to the stiffer side for a stronger kick response. This v3 copies the medium v2 geometry and process, while preserving the firmer layup as the stiff competition version.
Planning
Foot pockets ready
Make sure your foot pockets are on hand before you start. If you still need to choose a pair, follow the steps in Choosing the foot pockets. Once the pockets are sorted, lay out a fresh cutting template with Laminated paper cutting template.
Heads-up: The dimensions below assume 170 mm of blade will slide into the foot pocket. Measure your pockets to confirm before cutting.
Specifications / Dimensions
Target outline for each blade:
- Width: 18 cm
- Total length: 17 cm + 58 cm = 75 cm
- 0–17 cm: inside the foot pocket (flat section)
- 17–75 cm: free blade to the trailing edge
Layer schedule (one blade)
For this build I am going to be using a triangles to smooth the transition between the various thickness levels.
- Reserve 17 cm from the heel line for the bend zone.
- Layer 1: 20 cm × 80 cm
- Layer 2a: 20 cm × 80 cm half triangle
- Layer 2b: 20 cm × 80 cm the other half triangle
- Layer 3: 20 cm x 80(-35) ^ mid shape triangle
- Layer 4: 20 cm x 75(-15) V side shape
- Layer 5: 20 cm x 55(-10) V side shape
- Layer 6: 20 cm x 45(-10) V side shape
- Layer 7: 20 cm × 80 cm top ply
 |
 |
|---|---|
| Expanded Laminate View | Laminate Thickness Profile |
Cutting plan
 |
|
||
|---|---|---|---|
| Cutting plan for first blade | Cutting plan for second blade (identical) |
Estimating the flex
Start with the Flex predictor modelling workflow to sanity-check the layup. Adjust the layer stack and bend allowance until the predicted deflection matches your training goal.
Free blade length [mm]: 580 Blade width [mm]: 180 Layers at foot: 7 Layers at tip: 2 Min layer length [mm]: 200
 |
 |
|---|---|
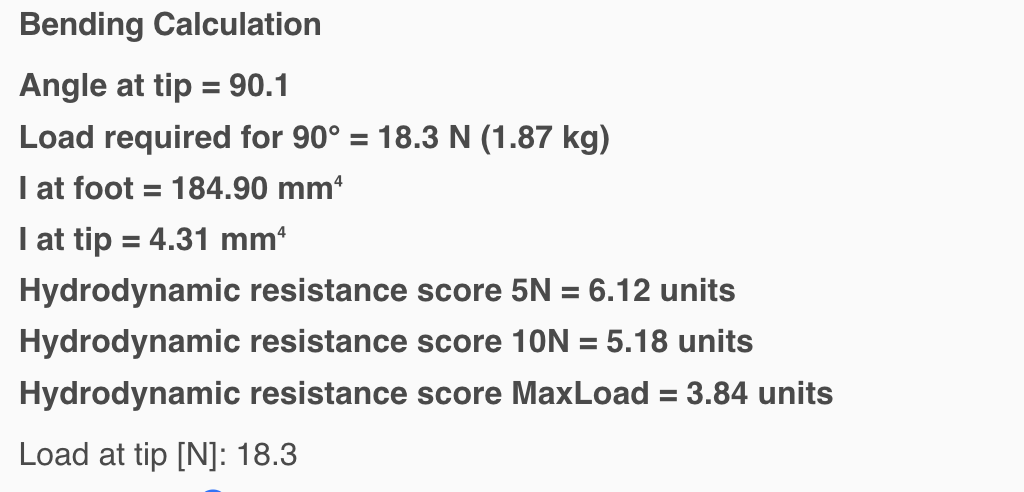
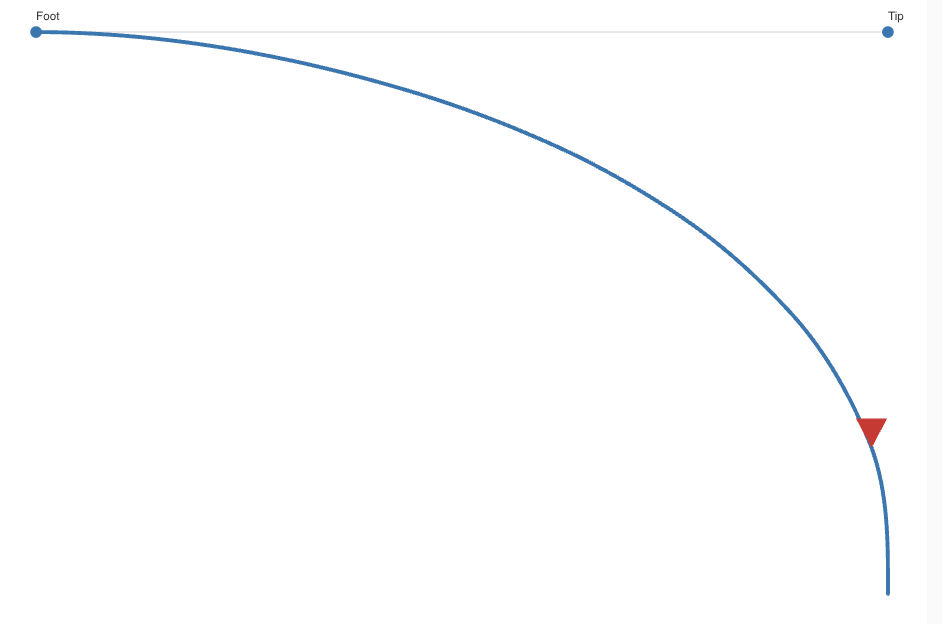
| Bending Calculation | Bending Profile |
Note: In the real blade, the actual bending point will move toward mid-blade. We are cutting out triangles to push more stiffness toward the foot.
Predicted:
- Load required for 90° = 18.3 N (1.87 kg)
- Hydrodynamic resistance score 5N = 6.12 units
- Hydrodynamic resistance score 10N = 5.18 units
- Hydrodynamic resistance score MaxLoad = 3.84 units
The predicted code for this fin would be (see hydrodynamic resistance codes):
C580-18-R61-F10
Reference images
TODO after build.
Time needed
| Technique | Implementation | Waiting |
|---|---|---|
| Foot pockets Choosing the foot pockets |
||
| Base Support Creating a laminating base |
0.75 h | 0 h |
| Laminating Carbon Creating the carbon laminate ×6 |
1.5 h | 12 h |
| Vacuum Bagging Reducing the resin percentage of the laminate |
0.25 h | 0 h |
| Cutting Cured Carbon Producing the final shape |
1 h | 0 h |
| Finishing Carbon Finishing the carbon laminate surface |
0.1 h | 24 h |
| Gluing Fin Rails Gluing Fin Rails |
0.5 h | 12 h |
| Total | 4.1 h | 48 h |
Bill of Materials
| Technique | Material | Quantity | Unit Cost | Line Cost |
|---|---|---|---|---|
| Foot pockets Choosing the foot pockets |
Bifin Footpockets Reusable Pair of angled freediving pockets with short rails |
1 pair | £36.00 - £58.00 per pair (recorded range) | |
| Foot pockets total | £36.00 - £58.00 | |||
| Base Support Creating a laminating base |
Acrylic sheet (A3, 2 mm) Reusable Six panels for laminating base |
1 6 pack A3 sheet (2 mm) | £16.00 per 6 pack A3 sheet (2 mm) | £16.00 |
| Plywood sheets (300 × 200 × 1.5 mm) Reusable Pack of thin plywood sheets for wedges |
1 Pack of 8 sheets (300 × 200 × 1.5 mm) | £8.48 per Pack of 8 sheets (300 × 200 × 1.5 mm) | £8.48 | |
| Plastic corner braces Reusable 90° braces to lock triangles into a wedge |
1 Pack of plastic 90° corner braces | £4.89 per Pack of plastic 90° corner braces | £4.89 | |
| Super glue Consumable Fast-set cyanoacrylate for bonding braces to plywood |
1 3-5 g tube | per 3-5 g tube — Inexpensive | ||
| Cello tape roll Consumable Clear tape to tack the wedge to the acrylic or bench |
1 roll | Inexpensive | ||
| Electrical tape roll Consumable Wide PVC tape to join acrylic seams |
1 roll | Inexpensive | ||
| Base Support total | £29.37 | |||
| Laminating Carbon Creating the carbon laminate |
Carbon Fiber Fabric Consumable 0.3 m² of 200 g/m² 3K 2/2 twill cloth |
1.8 m² (1 m wide) scaled ×6 — base 0.3 m² (1 m wide) |
£17.00 per m² (1 m wide) | £30.60 |
| Laminating Epoxy System Consumable 150 g mixed resin (approx. 150 ml) |
1.5 500 ml kit scaled ×6 — base 0.25 500 ml kit |
£15.00 per 500 ml kit | £22.50 | |
| Pva Release Agent Consumable Two thin coats on the laminating base |
1.05 200 ml bottle scaled ×6 — base 35 ml (two thin coats) |
£5.00 per 200 ml bottle | £5.25 | |
| Peel Ply Consumable Two layers cut to the blade outline |
0.6 5 m pack (1.5 m wide) scaled ×6 — base 0.6 m (1.5 m wide) |
£12.00 per 5 m pack (1.5 m wide) | £7.20 | |
| Consumables pack Consumable Gloves, mixing sticks, acetone wipes |
6 pack scaled ×6 — base 1 pack |
£1.00 | £6.00 | |
| Laminating Carbon total | £71.55 | |||
| Vacuum Bagging Reducing the resin percentage of the laminate |
Vacuum Bagging Kit Reusable Heavy-duty storage bag plus compatible hand pump |
1 kit | £9.00 per kit | £9.00 |
| Breather Cloth Consumable Wraps part to distribute airflow |
0.5 m (1 m wide) | £12.00 per 5 m pack (1 m wide) | £1.20 | |
| Vacuum Bagging total | £10.20 | |||
| Finishing Carbon Finishing the carbon laminate surface |
Clear Coat Spray Consumable Two light passes for sealing and gloss |
0.2 400 ml can | £8.00 per 400 ml can | £1.60 |
| Acrylic Car Paint Consumable Single colour coat between clear layers |
0.25 400 ml can | £8.79 per 400 ml can | £2.20 | |
| Printable vinyl decal sheet (optional) Consumable Gloss white adhesive sheet for logos Optional branding layer |
1 sheet | £1.50 | £1.50 | |
| Finishing Carbon total | £5.30 | |||
| Gluing Fin Rails Gluing Fin Rails |
Rubber Fin Rails Consumable One pair of soft rubber rails sized for bifin blades |
2 m (enough for four rails) | £6.00 per metre | £12.00 |
| Plastic To Carbon Adhesive Consumable 25 ml of 3M DP420 mixed with nozzle |
1 25 ml syringe | £8.25 per 25 ml syringe | £8.25 | |
| Super Glue Consumable Thin cyanoacrylate to wick into any tiny gaps after bonding |
1 3-5 g tube | per 3-5 g tube — Inexpensive | ||
| Fold-back clips set Consumable 20 mm binder clips for clamping rails during cure |
1 set | Inexpensive | ||
| Gluing Fin Rails total | £20.25 | |||
| Consumables subtotal £98.30 | + | Reusable subtotal £74.37 - £96.37 | = | Grand total £172.67 - £194.67 |
Tools Required
| Tool | Techniques | Purpose |
|---|---|---|
| Brushes | Laminating Carbon | Apply resin and coatings evenly across the laminate |
| Craft knife | Base Support | Cut plywood triangles and trim edges |
| Digital scale | Laminating Carbon | Weigh resin batches for accurate mix ratios |
| Dust mask | Cutting Cured Carbon | Prevent inhalation of carbon dust during cutting |
| Dust mask or respirator | Finishing Carbon | Avoid inhaling paint mist |
| Fine-tip applicator (optional) | Gluing Fin Rails | Control super glue wicking along the rail seam |
| Gloves | Laminating Carbon Cutting Cured Carbon Finishing Carbon Gluing Fin Rails |
Protect your hands from resin, adhesives, and carbon fibers Protect your hands from paints and solvents |
| Junior hacksaw with a fine-tooth metal blade | Cutting Cured Carbon | Cut the cured carbon cleanly without fraying |
| Lint-free cloth | Finishing Carbon | Wipe dust and fingerprints before spraying |
| Metal file | Vacuum Bagging Cutting Cured Carbon |
Smooth cut edges and remove burrs |
| Mixing pots | Laminating Carbon | Measure and combine resin and hardener accurately |
| Mixing sticks | Laminating Carbon | Blend resin and hardener thoroughly |
| Plastic finned roller (75 mm) | Laminating Carbon | Consolidate layers and push out trapped air |
| Protractor or angle finder | Base Support | Mark 27° triangles and confirm wedge angle |
| Safety goggles | Cutting Cured Carbon Finishing Carbon |
Protect your eyes from dust and splashes Protect your eyes from overspray |
| Sandpaper | Gluing Fin Rails | Prepare and smooth surfaces for better adhesion and finish |
| Scissors | Laminating Carbon Vacuum Bagging |
Cut materials like fabric, film, or templates to size |
| Tape measure | Base Support | Check dimensions and spacing during setup |
| Window cleaner | Gluing Fin Rails | Degrease surfaces before bonding or sealing |
Instructions
- Build a 1000 mm × 600 mm laminating base following Creating a laminating base so both blades can be laminated at the same time.
- Lay up the carbon according to the schedule above, using the steps in Manual wet layup stack.
- Pull the stack under vacuum to tighten the fiber volume, referencing Enclosed bagging.
- Trim the cured laminate to the template with the Junior hacksaw method.
- Seal the surface with the approach in Clear coat and acrylic paint.
- Bond the rails using the guidance in Two-part adhesive plus super glue.
Results
Desired vs Predicted vs Actual
Record the flex after fabrication using the Kitchen Scale Test.
| Desired | Predicted | Actual | Notes | |
|---|---|---|---|---|
| Free blade size | 580mm | 580mm | TODO | Copied from v1 baseline geometry |
| Blade width | 180mm | 180mm | TODO | Copied from v1 baseline geometry |
| Load for 90 degrees | 1.8-2.0kg | 1.87kg | TODO | Validate after first flex test |
Water trial
TODO after build.
| Desired | Actual | Notes | |
|---|---|---|---|
| Hydro resistance 5N | TODO | TODO | Measure after first water trial |
| Hydro resistance 10N | TODO | TODO | Measure after first water trial |
Final code after build and testing (see hydrodynamic resistance codes):
TODO